PSC Panther Ausf G 1945 Tutorial Pt. 1.
Simple how to paint some fantastic tanks!
You will need an airbrush to accomplish this.
Right off the bat you will need to assemble your model. This doesn't take long. The best way to tackle a Plastic Soldier kit is in stages. One assembly at a time, then assemble the parts at the end. A sharp hobby knife and plastic snips makes this a breeze. Plastic model glue with a needle nose dispenser is vital!
The next stage is a fine primer coat. I use a Tamiya light grey primer. This allows me to catch all of the things I missed in assembly. I kept a few hatches and the mufflers off. It's easier to airbrush the primer red parts this way.
Your base coat will be XF-58 Olive Green. Reason being in December 1944, the Germans changed their base color from Dark Yellow to Dark Green. XF-58 works best for this, when I apply the filter later it'll blend in perfectly. Also airbrush the lower end of the mufflers that attach to the hull.
The first camo color is XF-57 buff. I applied this how I saw fit. I thought that since it's 1945 the guy on the ground painting this really isn't going to care. Just get it done in a way that looks right to you. Buff seems a bit light, but wait until the filter step in pt. 2
Repeat the previous step, but this time with XF-68 Nato Brown.
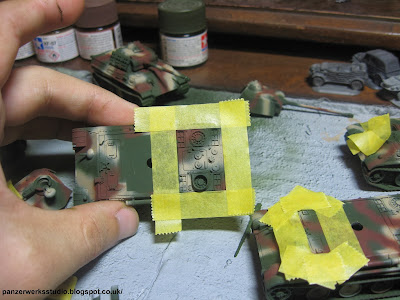
The great thing about PSC models is the very precise panel lines and details. With Tamiya 10mm masking tape I've taped around panels I want to airbrush in a red oxide color. Sets a great "endkampf look".
For red oxide I mixed XF-7 Flat Red with XF-64 Red Brown. At this stage airbrush the panels you taped around. Also tape around the green for the mufflers and airbrush the muffler tubes red oxide. Pick out some road wheels and maybe even the barrel if you wish.
Peel the tape, glue on your hatches and mufflers. You're now ready for part 2, which I will cover later.


Good tutorial. I like your colour choices. Would you see things like the back hatches in the primer coat and the rest of the model painted in camo? Would this be replacement of parts in the field? Just curious.
ReplyDeleteGreat Tutorial! Looking forward to part 2 as well as more thoughts on Battlegroup.
ReplyDelete